I had not heard of BEXEL Manager, a construction planning and scheduling application, prior to being invited to check it out, followed by a detailed briefing and an evaluation copy to test. And when I did, I was amazed at how sophisticated and comprehensive its capabilities were, and I was mystified about why I did not know of it earlier. It’s almost as if a fully-formed product has materialized in front of us out of thin air, all primed and ready to do what it was designed to do, with none of the growing pains that typically accompany products in their journey from birth to maturity.
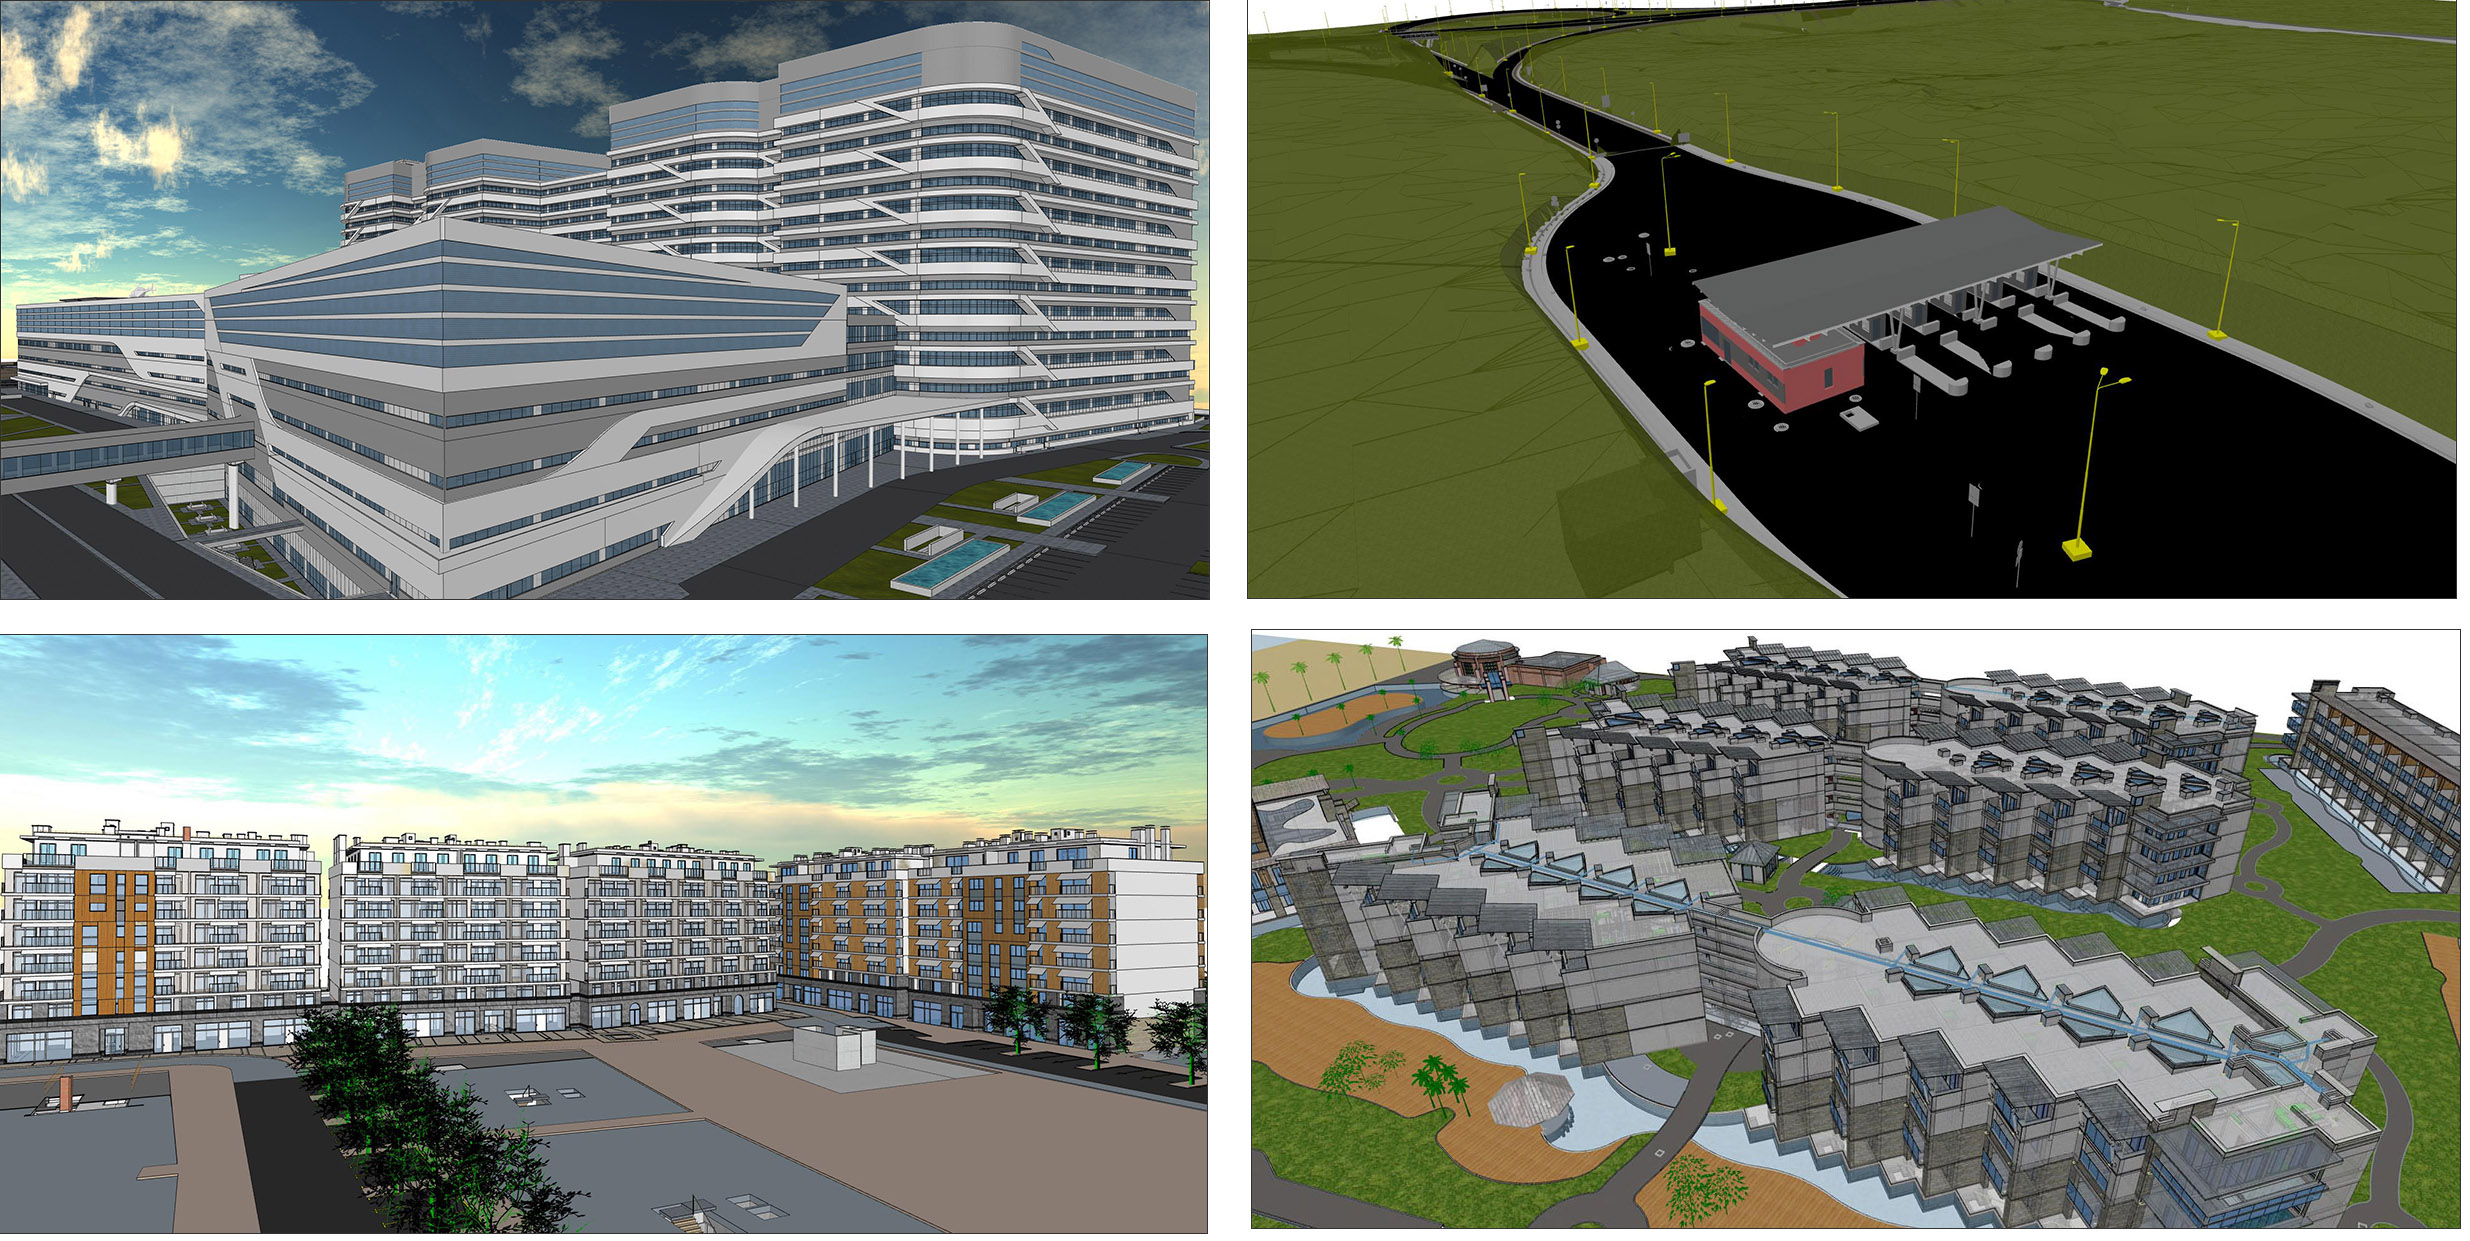
It turns out that there is a good reason for this. The product was developed over 15 years ago by BEXEL and has been used since then for its own consulting services in the construction management of projects all over the world (Figure 1). It has recently been launched as a commercially available software application that can be used independently of BEXEL Consulting for integrated 4D/5D project management.
The infographic in Figure 2 captures all the capabilities of BEXEL Manager, starting with coordinating the multiple disciplinary BIM models (3D BIM), construction planning and scheduling (4D BIM), quantity take-off and estimating (5D BIM), and finally, extending the use of the model to FM (6D BIM).

BEXEL Manager is the flagship product of the company, which, as mentioned earlier, has been in use for 15 years in BEXEL’s consulting services for construction management. With the launch of BEXEL Manager as a commercial application, BEXEL has also extended the product family to include multiple applications, most of which are subsets of the main application. These include BEXEL Manager Lite for smaller projects that contain up to 15,000 building elements, BEXEL Engineer for all the 3D BIM capabilities that were shown in Figure 2, and BEXEL FM for the 6D BIM capabilities. In addition, BEXEL has recently launched BEXEL CDE, which complements the desktop-based BEXEL Manager with a cloud-based collaboration module that allows projects to be created and shared by multiple users and includes advanced versioning and archiving capabilities.
Other key aspects of BEXEL Manager include the availability of seven localized versions including English, Spanish, German, French, Italian, Russian, and Korean, with several more in development; it has been implemented in over 180 construction projects across 40 different countries, and is additionally being used in over 130 countries for academic teaching and research in engineering and construction; it is a multinational member of buildingSMART International and is IFC certified; it is an authorized Autodesk developer with an add-in for Revit for direct integration; it includes wizards for automating many aspects of costing and scheduling; and it also includes APIs that can be used by customers with programing resources to develop custom add-ins that extend the capabilities of the application.
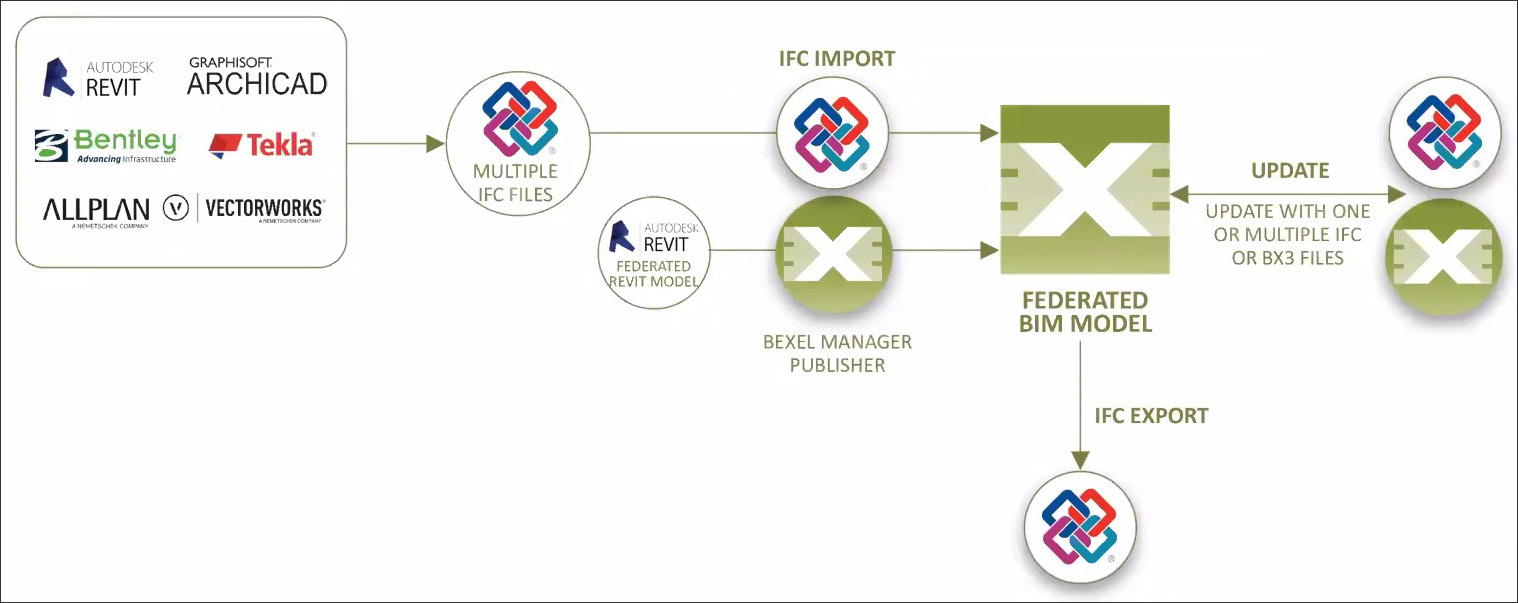
The starting point in BEXEL Manager is creating a federated 3D model from the multiple disciplinary models that were created for the project. As shown in the graphic in Figure 3, the models can come from different BIM applications such as ARCHICAD, Revit, Bentley OpenBuildings, Allplan, etc. that can export IFC files. For Revit, there is also a BEXEL Manager add-in that can be used to directly publish the model to BEXEL’s BX3 format. A BEXEL project can be created by merging either IFC or BX3 files.
Each BEXEL project is created in a separate folder. I found the level of compression quite significant; for example, the project shown in Figure 4 was created by merging three IFC files which individually added up to over 100 MB, whereas the size of the BEXEL project folder was about 16MB. These IFC files are individual disciplinary models of the architecture, structure, and MEP elements, and they are aggregated in BEXEL Manager based on their origin points as specified in the BIM authoring tool in which they were created. A summary of the project shows the number of sources of the model and the total number of elements. Once the costing has been done, the total cost of the project is also shown.
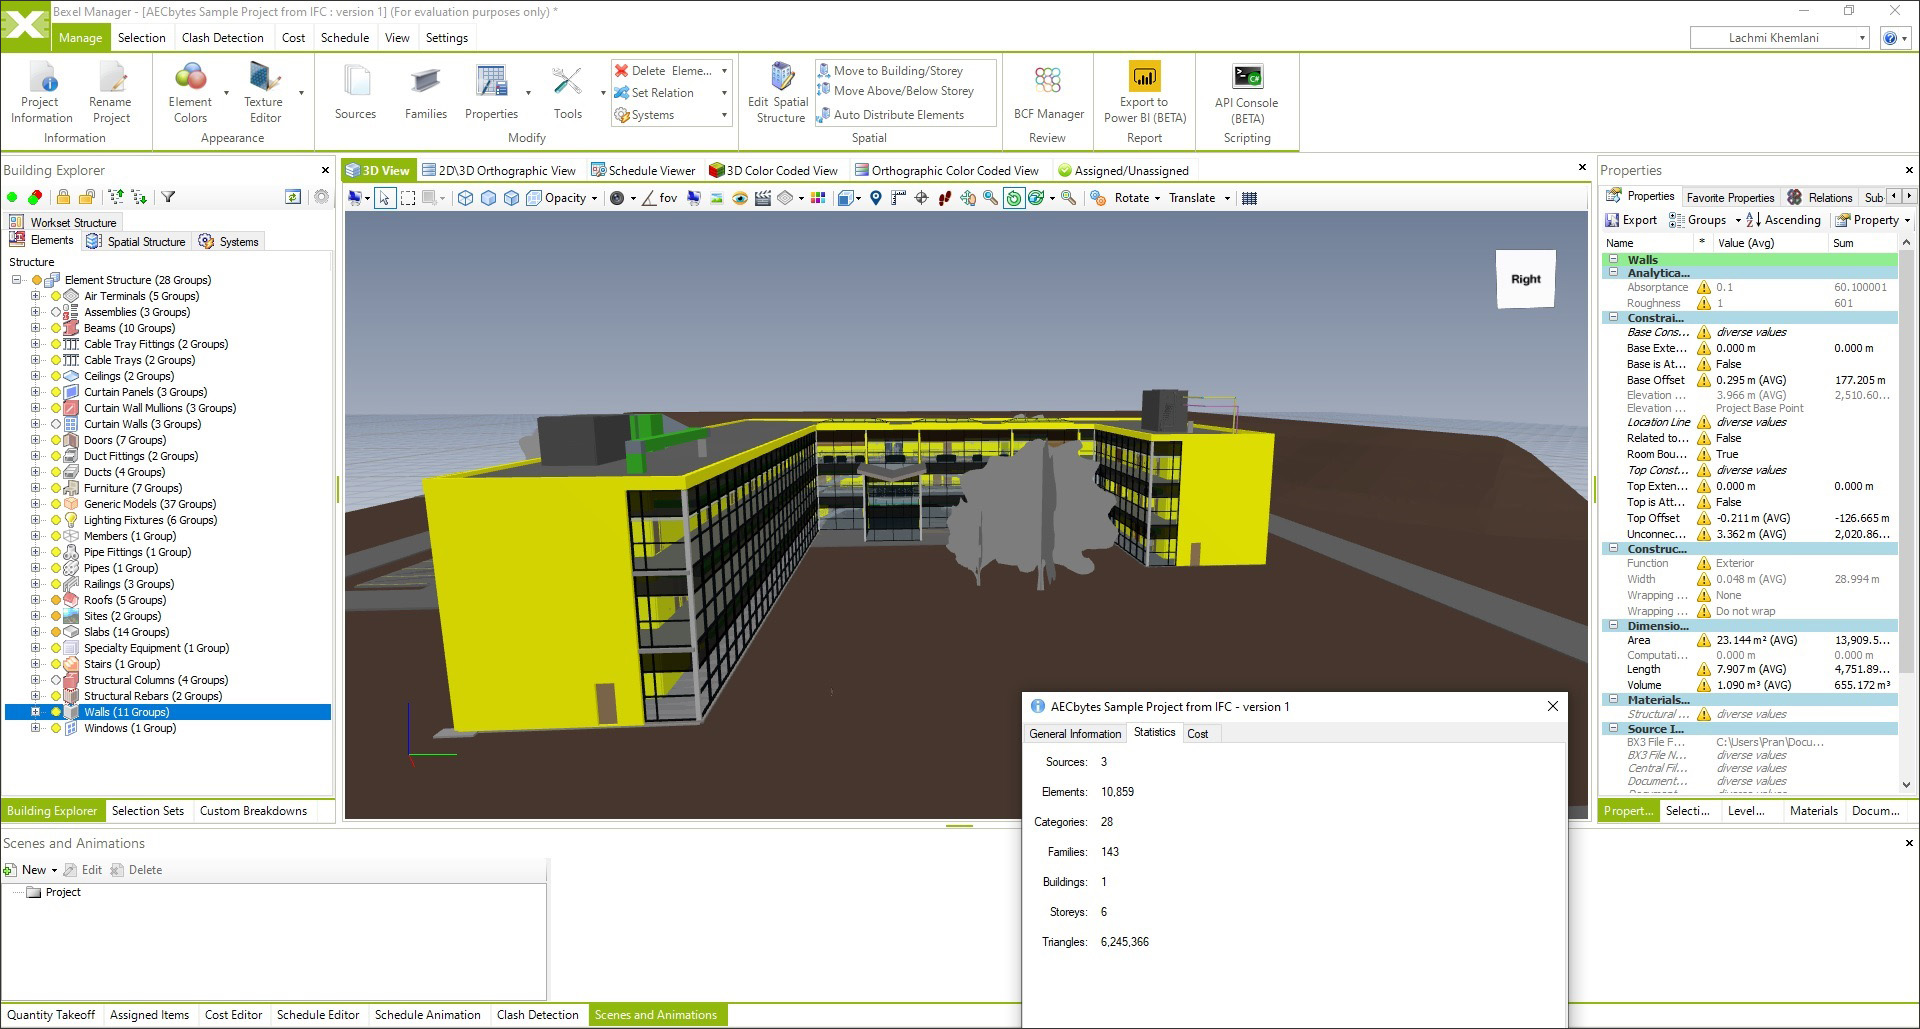
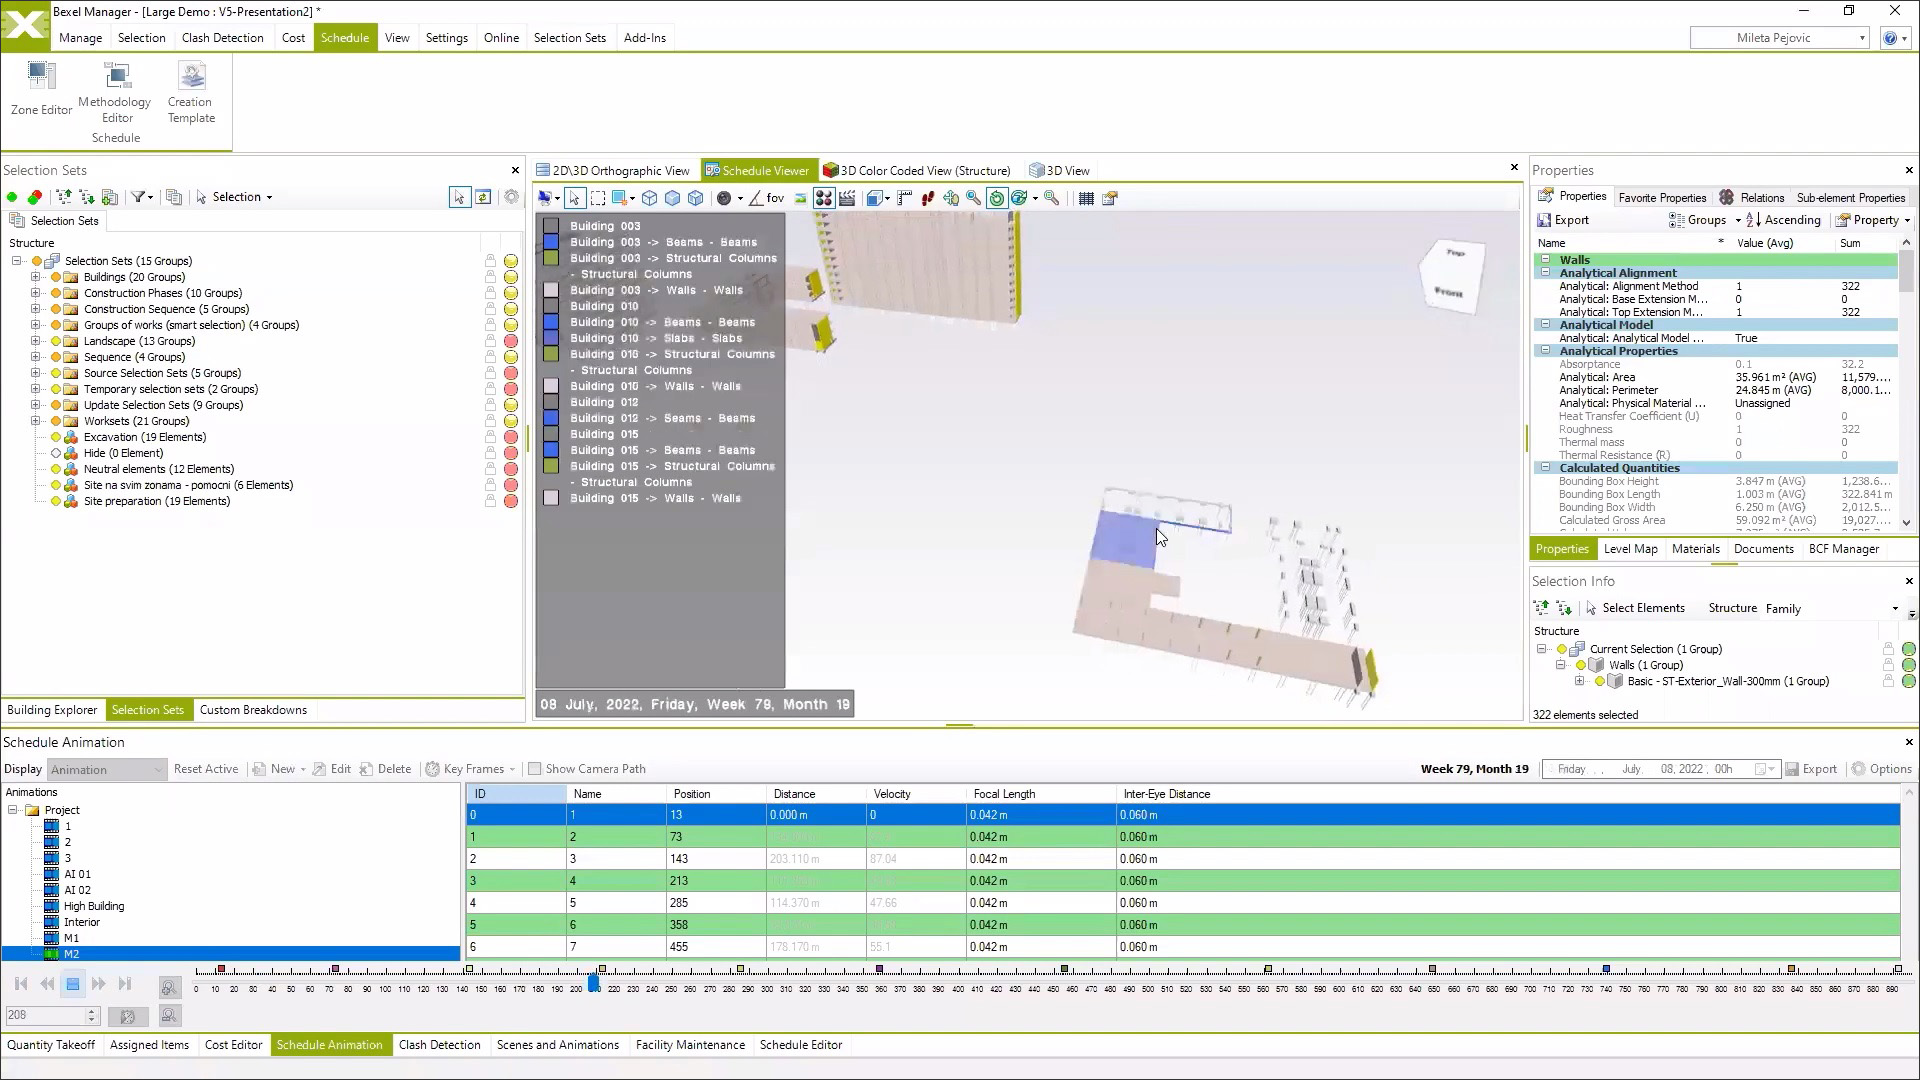
The interface of the application, as shown in Figure 4, has a lot of tools and options, but they are well organized and do not make the application seem intimidating. The Building Explorer palette shown on the left allows the elements to be browsed in different ways including by element type and hierarchical spatial structure, with options for toggling visibility and locking/unlocking as well as powerful searching and filtering capabilities. The properties of selected elements can be viewed in detail in the palette on the right. As with any model viewing tools, there are the usual Zoom, Pan, Orbit, and several additional tools to explore the model as desired. You can also create scenes, views, and animations, and export them to share them with others.
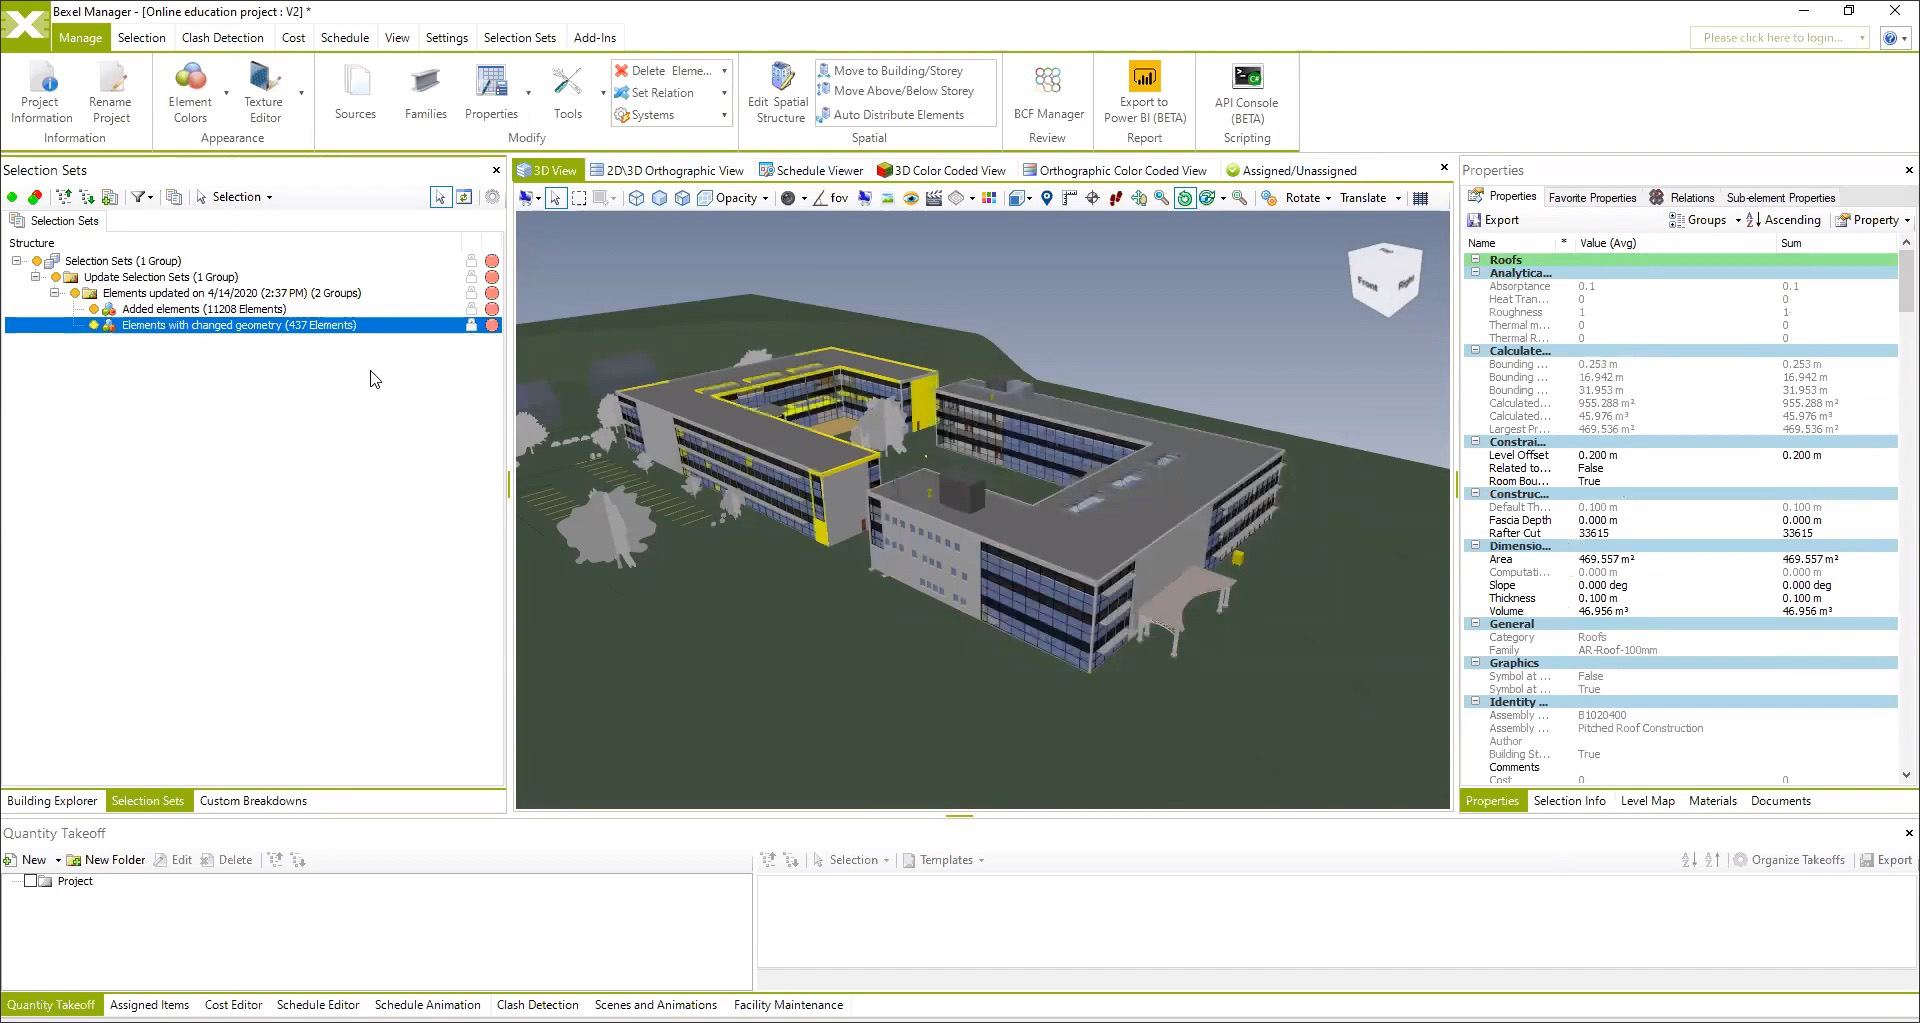
A few additional things to note related to this preliminary step of creating the federated model. First, it is possible to create multiple versions of the project as it is updated. To create a new version, you don’t need to merge the files again from scratch—you can simply specify which files to update. There is a viewing option specifically designed to see the changes between subsequent versions of a project, as shown in Figure 5. If subsequent operations such as scheduling and costing have been done for the project, they are automatically updated for the new version of the project.
Second, the grouping of elements into broader categories in the Building Explorer is automatically done based on how they were created and defined in the authoring tool. If elements have been miscategorized or need to be reassigned to different groups, stories, or buildings, this can be done in BEXEL Manager. Since the application is not an authoring tool, it cannot make any changes to the geometry of elements; however, it does allow existing properties to be changed or new properties to be added to an element. These additional properties or any reassignments, if done, can be brought back to the BIM authoring tool by exporting it back to IFC from BEXEL Manager and importing it into the BIM application. (Similar to the Revit add-in for exporting from Revit, there is also an add-in for importing properties from BEXEL Manager.) This is also how scheduling and costing information for each element, once these processes are done, can be brought back into the BIM applications if needed.
For all subsequent processes in BEXEL Manager starting with model checking and clash detection, the ability to create custom groups or categories is essential, and this is done with the Selection Sets functionality. While selection sets can be created by selecting elements manually, BEXEL Manager provides a sophisticated interface for creating rules for grouping elements. There are so many methods to define rules (including Regex expressions—a sequence of characters that define a search pattern) that they can get extremely complex, allowing a high level of granularity in the elements that are selected using them. An example of a simple rule creating a selection set is shown in Figure 6—it comprises all elements whose construction sequence has been defined as “Phase 1.”

Selection sets created using rules are referred to as “smart” selection sets because when the project is updated with new versions of the models, the rules still apply and the selection sets automatically show the updated elements. Selection sets can be imported and exported, so they can be shared across projects. Also, all the selection sets created for the project can be explored in the Selections Sets palette, seen on the left in Figure 6, with the same visibility, locking, search, and filtering options as the Building Explorer palette.
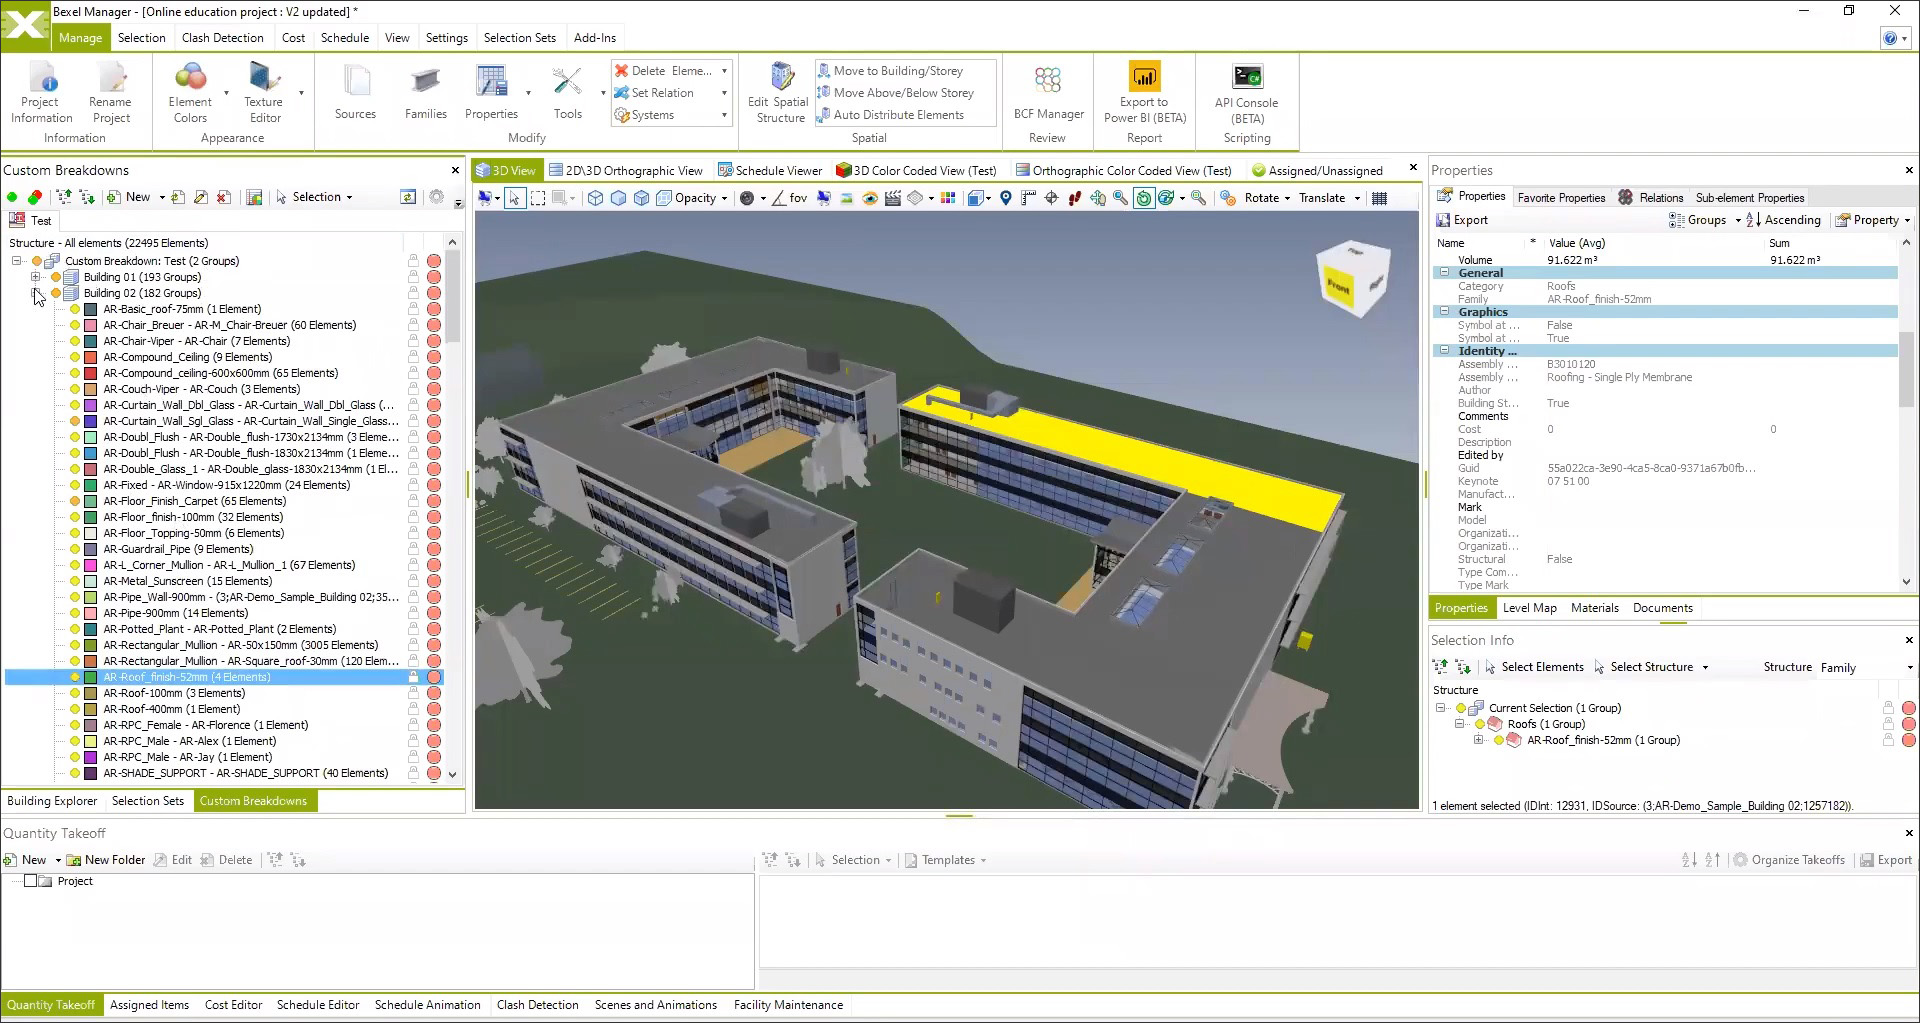
An additional categorization feature that subdivides the selected elements into groups is Custom Breakdowns. An example is shown in Figure 7 where a Test custom breakdown has been created with the first level of categorization is Building, followed by Family. You could potentially have many levels of these groupings; so for example, you could have a breakdown of Building > Material > Family, which would be similar to the example shown in Figure 7, except that elements of the same Family are now grouped by Material first and then by Family.
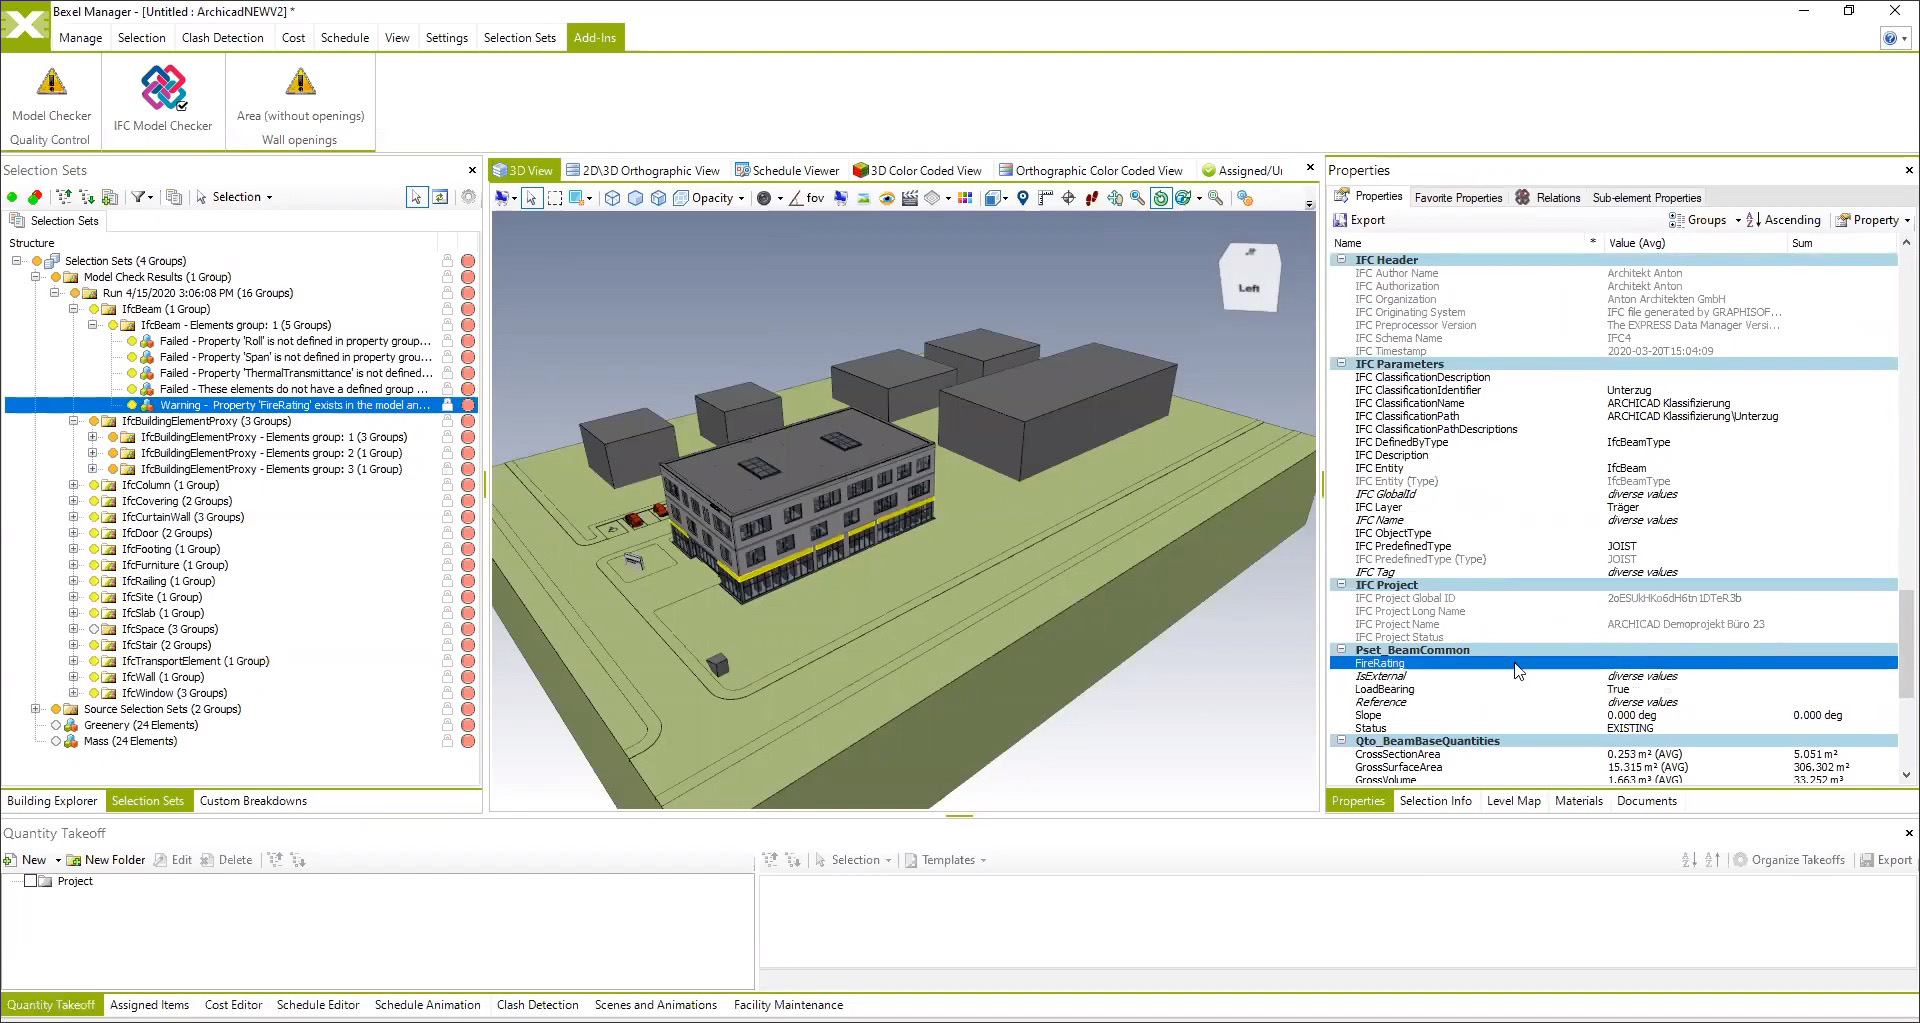
The ability to create selection sets as well as custom breakdowns is not only essential for scheduling and costing but also for checking the model to make sure that all elements have been assigned the correct names and properties as required for the project. Additionally, there are some add-ins for model checking that BEXEL had developed using APIs for its own consulting work, and these are now included in BEXEL Manager. An example is shown in Figure 8, which uses the IFC Model Checker add-in to find elements that are missing required values.
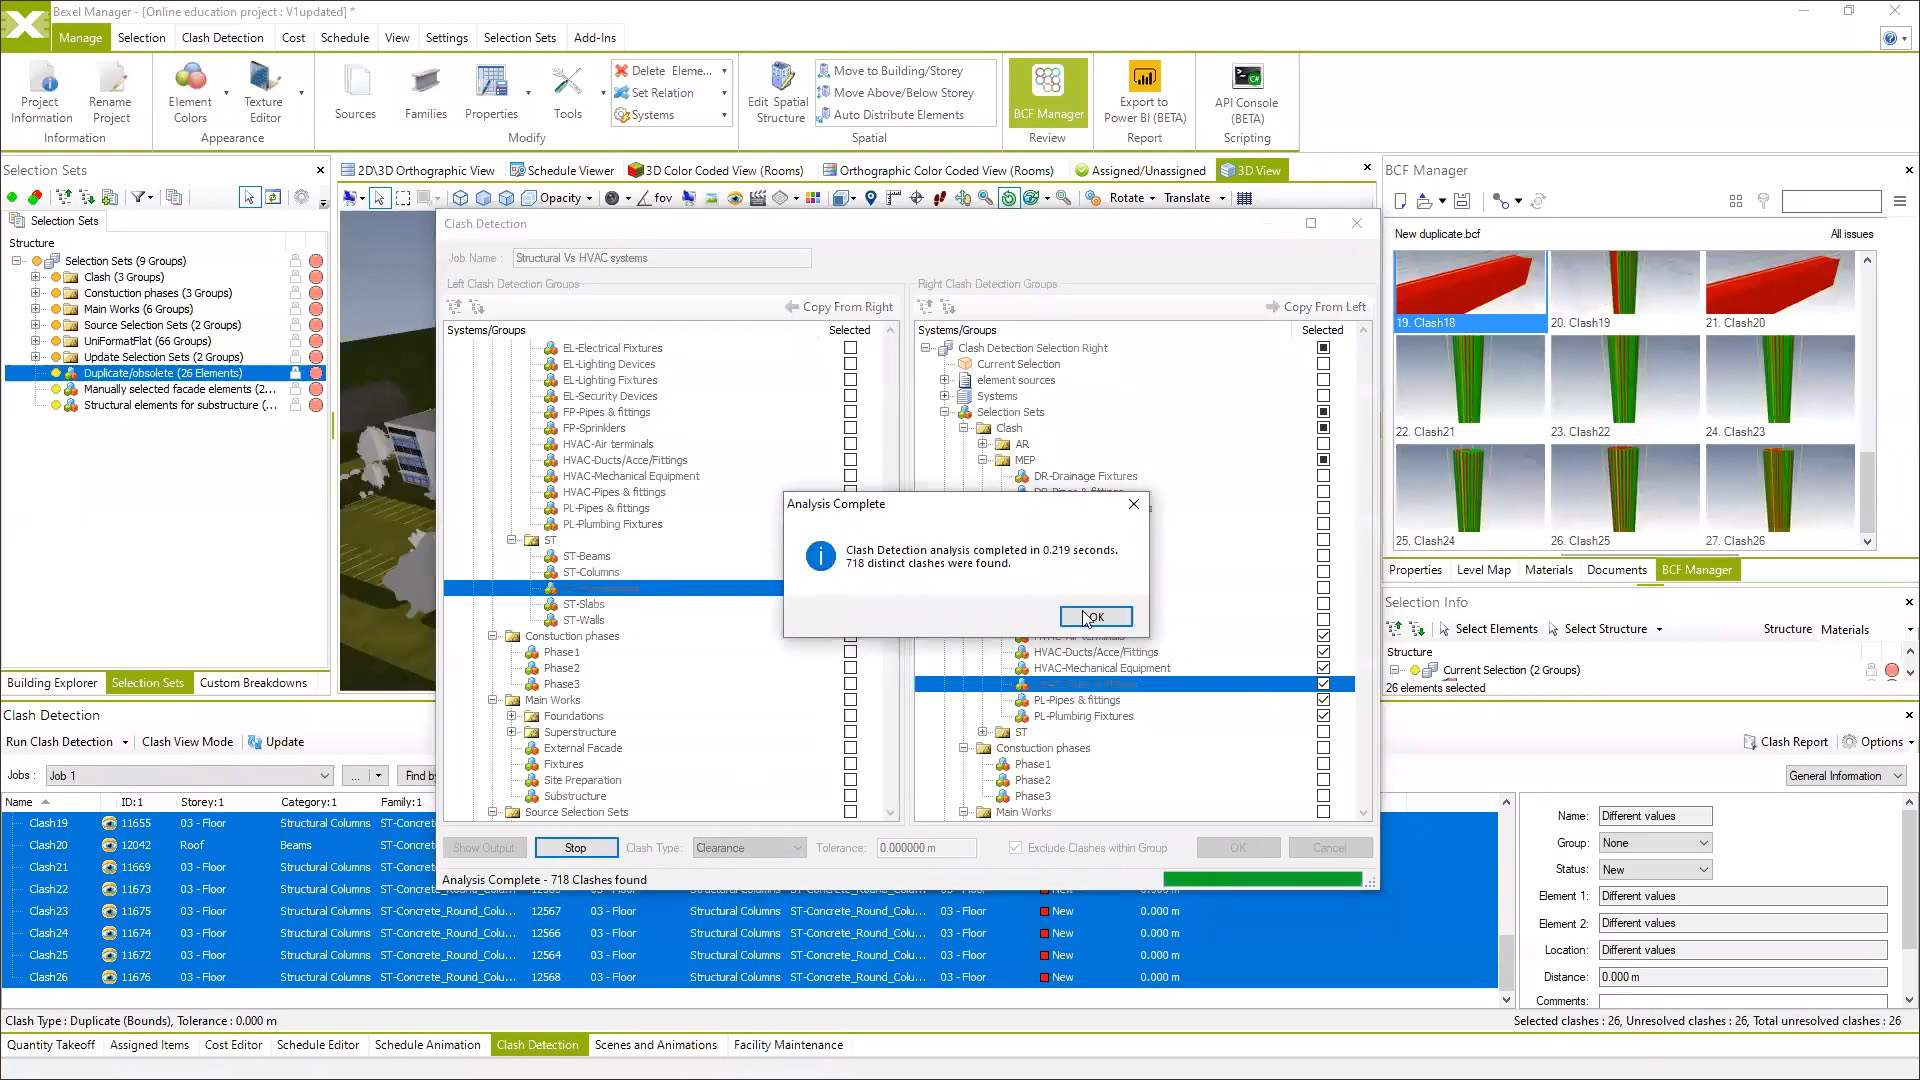
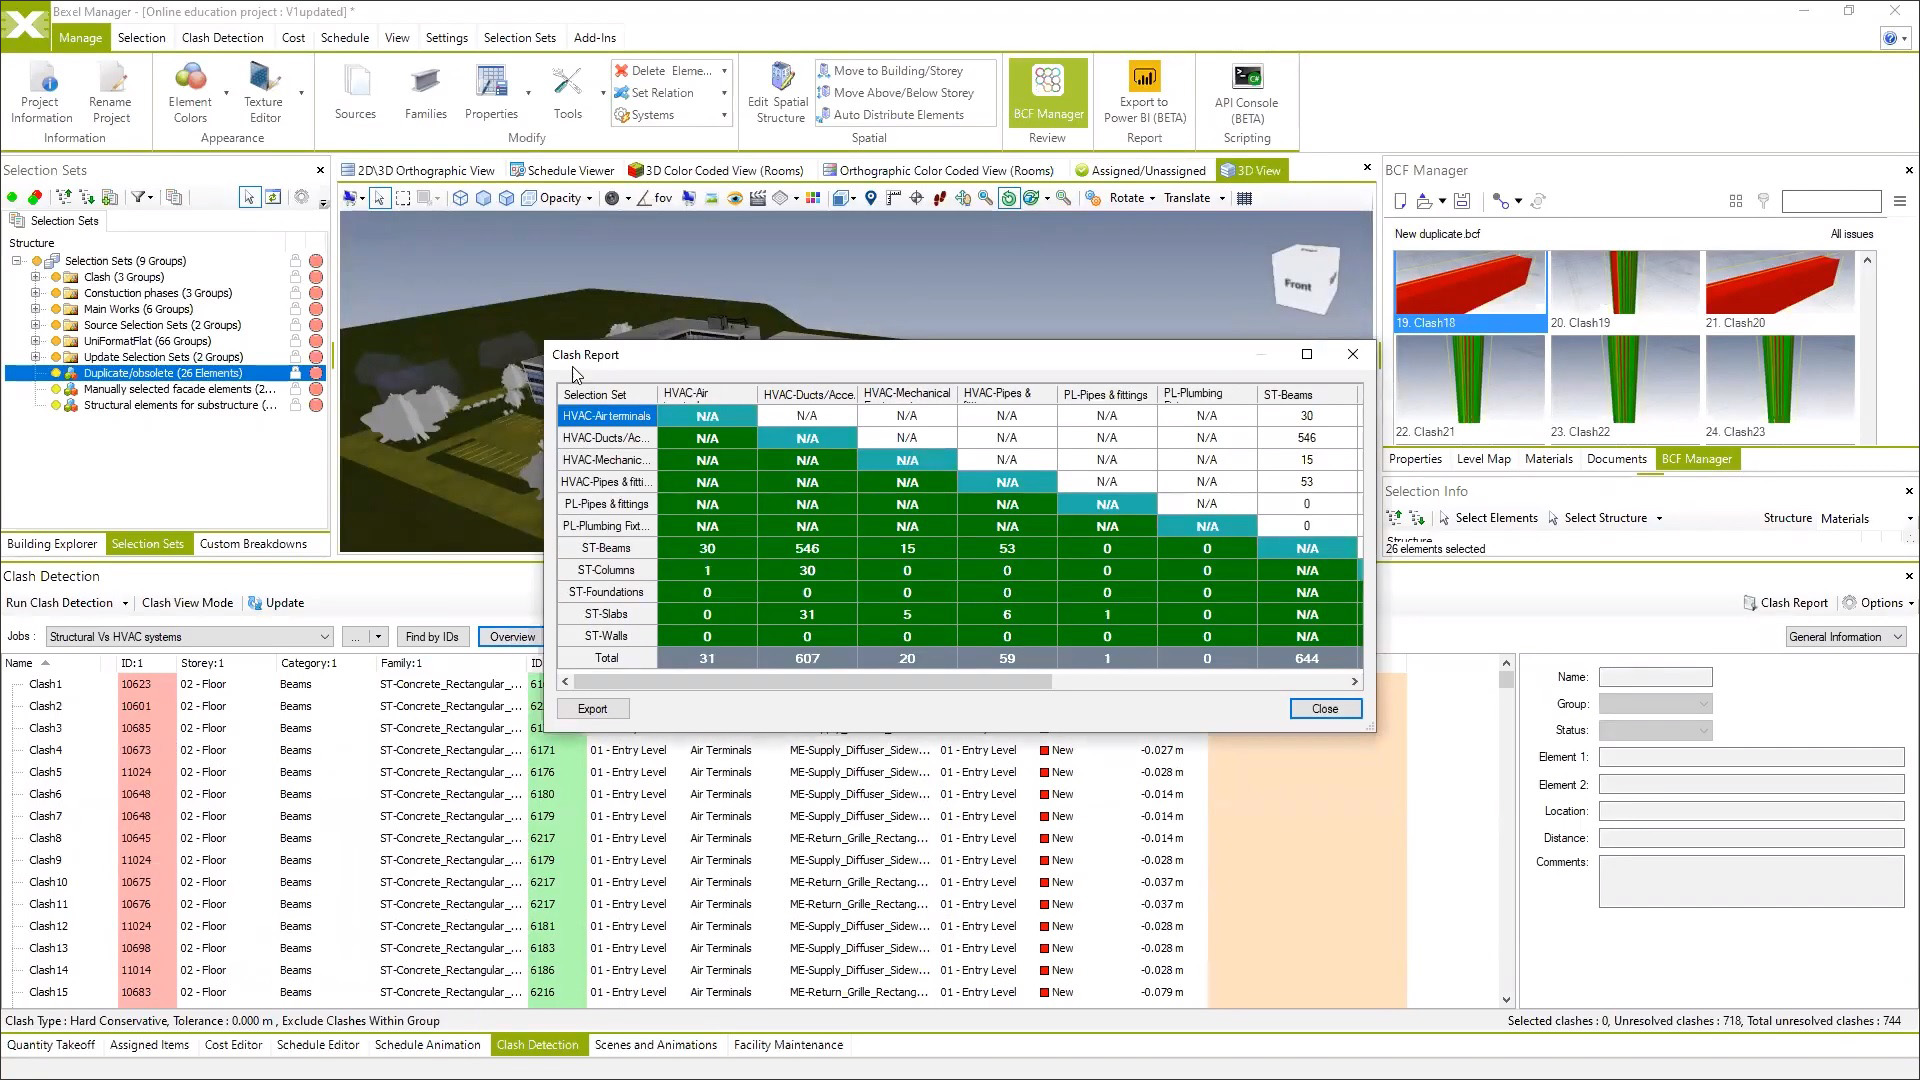
In addition to model checking to make sure all elements have been assigned the correct names and properties, BEXEL Manager includes a dedicated Clash Detection module for design coordination. As shown in Figure 9, you can use selection sets to specify which sets of elements to check for clashes, and you can also specify the type of clash and the tolerance, if any. In addition to individually reviewing each clash that is detected, you can see an overview of the results in the form of a matrix (Figure 10), which is extremely helpful.
Given the potentially large number of clashes in the initial stages of design coordination, filters can be applied to narrow the results and review a smaller number of clashes at a time. Since the clashes need to be resolved in the authoring tools that were used to create the individual disciplinary models, they need to be reported back to them. This is done by exporting the clash detection results in the standard BCF format. BEXEL Manager also includes BIMcollab integration, allowing the clashes to be directly sent to BIMcollab, which in turn, can use its integration with BIM authoring tools like Revit to import the issues, highlight the exact location in the model where they occur, and make it easier for them to be located and resolved (Figure 11).

The same Clash Detection module also allows any duplicate elements in the project to be identified and reported back to the BIM authoring tools.
Up until this point, the workflow in BEXEL Manager has been quite straightforward and easy to understand, especially with regards to how the multidisciplinary BIM models of a project are brought together and coordinated to resolve clashes and remove duplicates. The project is now ready to move on to the scheduling (4D) and costing (5D) processes, which are typically very complex and require highly specialized knowledge of construction planning and management, as captured by the infographic shown in Figure 12.
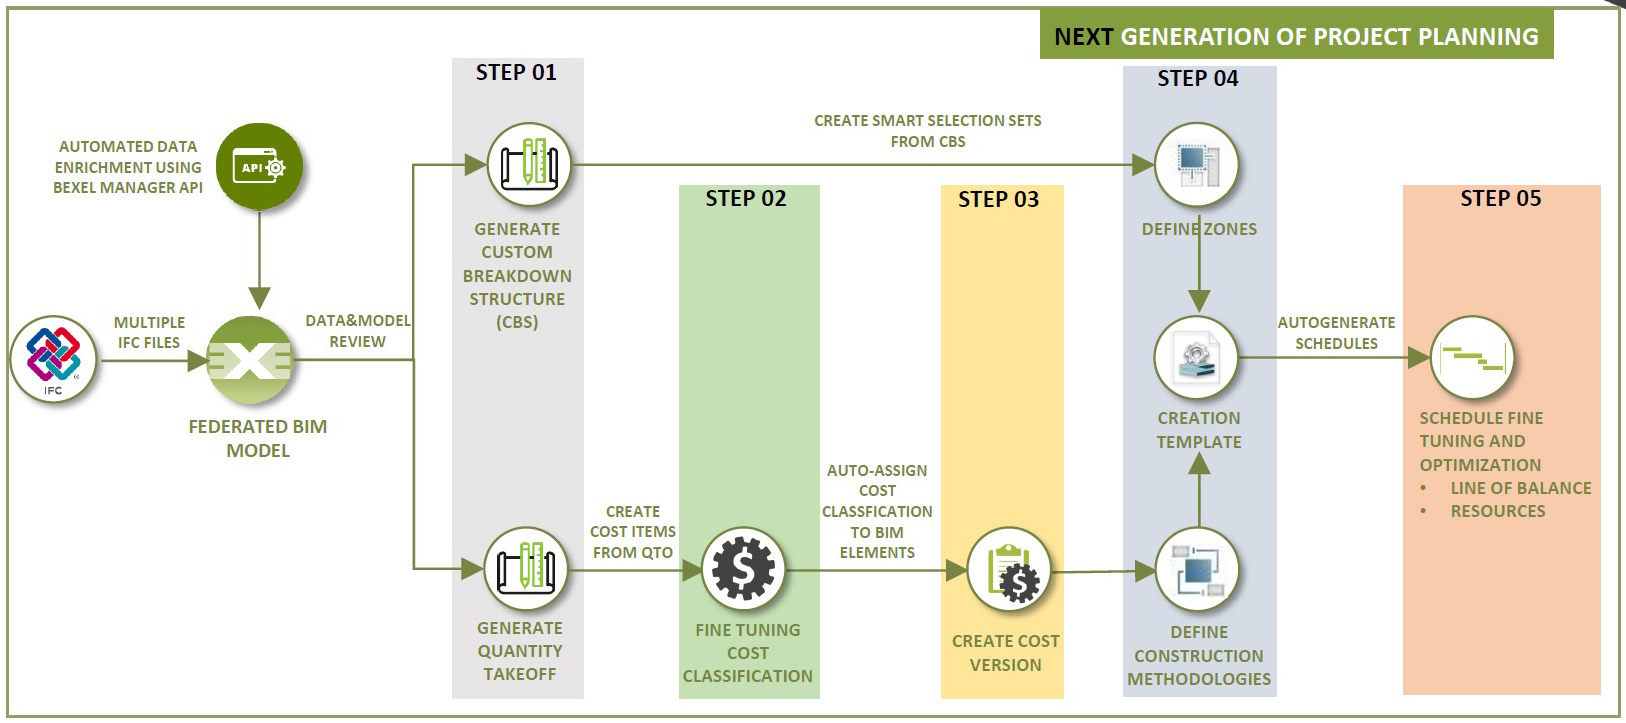
It should be noted that the workflow shown in Figure 12 is for creating an integrated 4D/5D project plan, which means that the scheduling and the costing are not done independently of one another, as they would in applications that just do scheduling or just do costing. The advantage of doing them in combination with each other is that they can inform each other and are therefore more accurate. For example, the costing will be able to include the time component for building elements such as equipment rental, storage, and so on; and the scheduling will benefit from having more accurate quantities.
The development of the integrated 4D/5D schedule in BEXEL Manager would start by creating custom breakdown structures (CBS) which will be used for scheduling, and creating quantity take-offs (QTOs), which will be used for costing. While the process of creating a CBS was discussed earlier and illustrated in Figure 7, the process of creating a QTO is very similar. Just as you can create as many custom breakdowns as required, you can also create multiple QTOs, as shown in Figure 13. In addition to the selected elements, the QTO shows their total quantity calculation, which in this example is Volume.

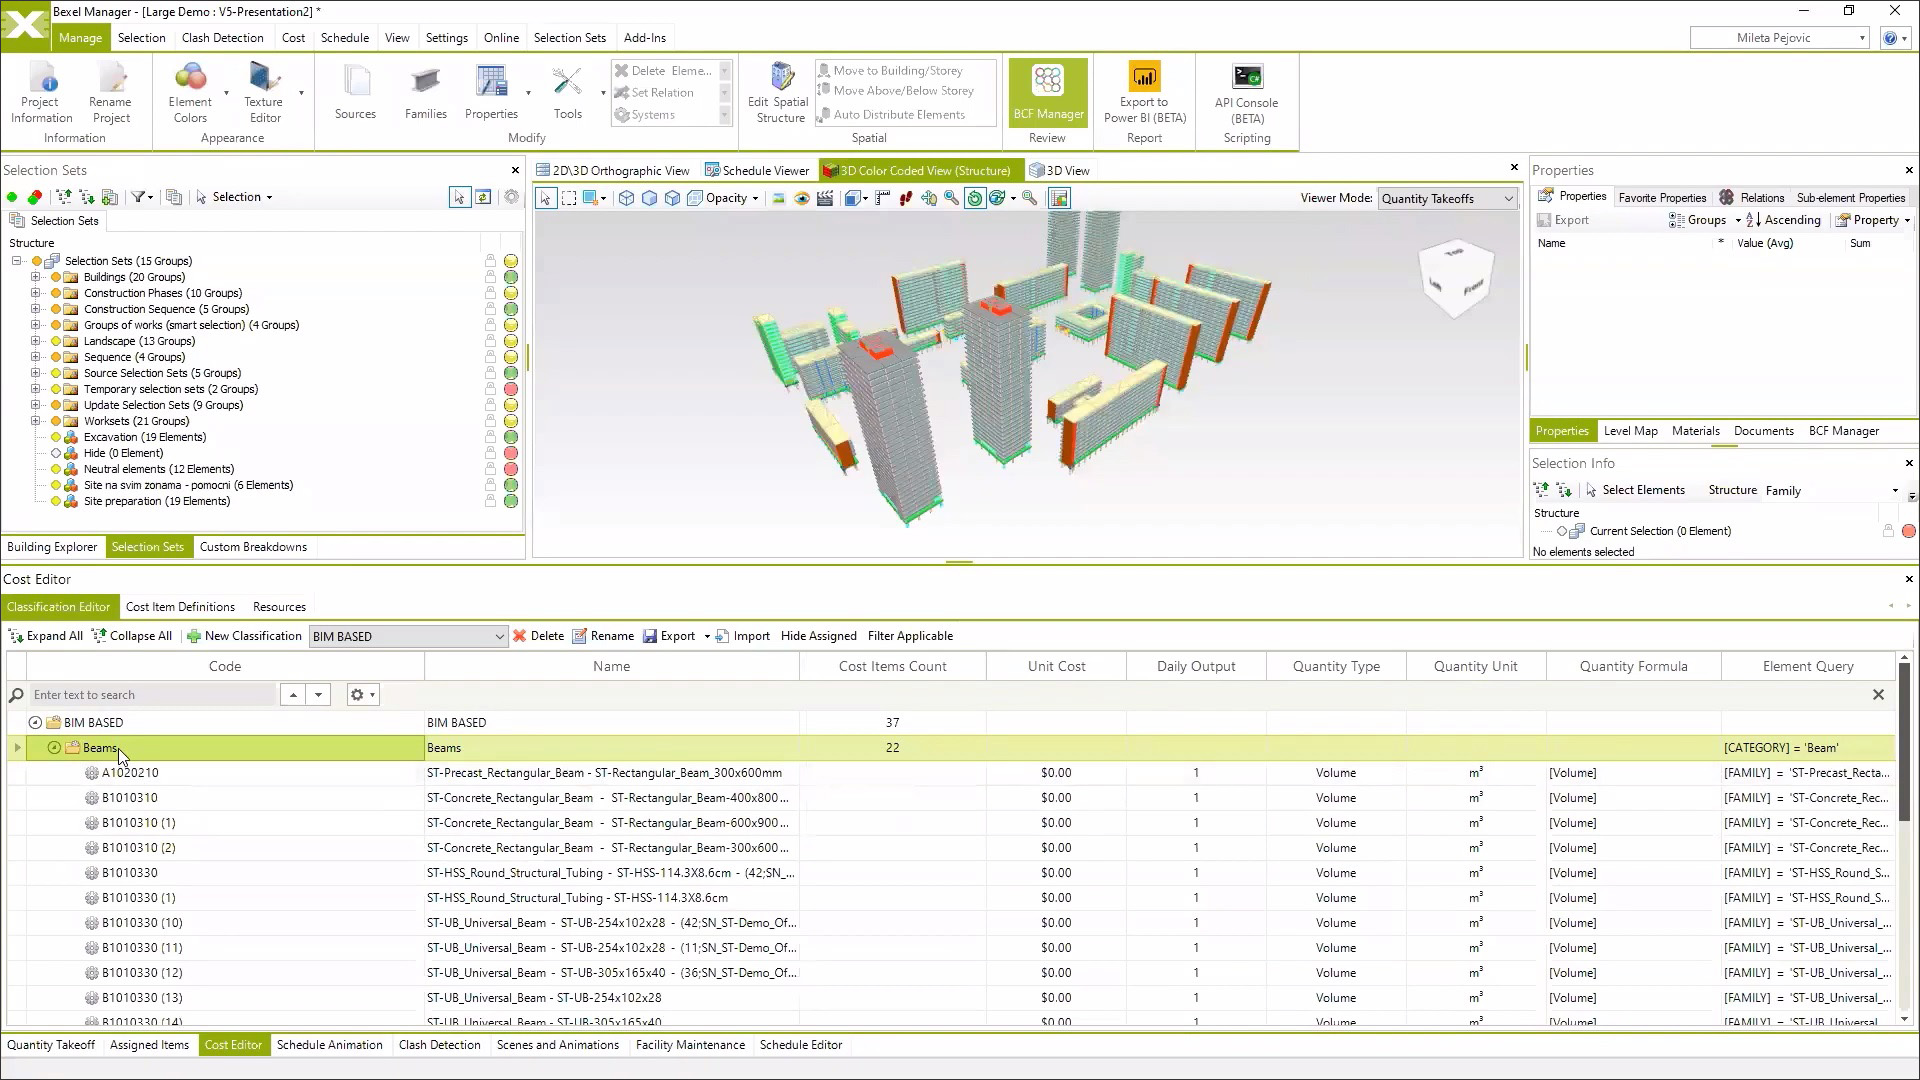
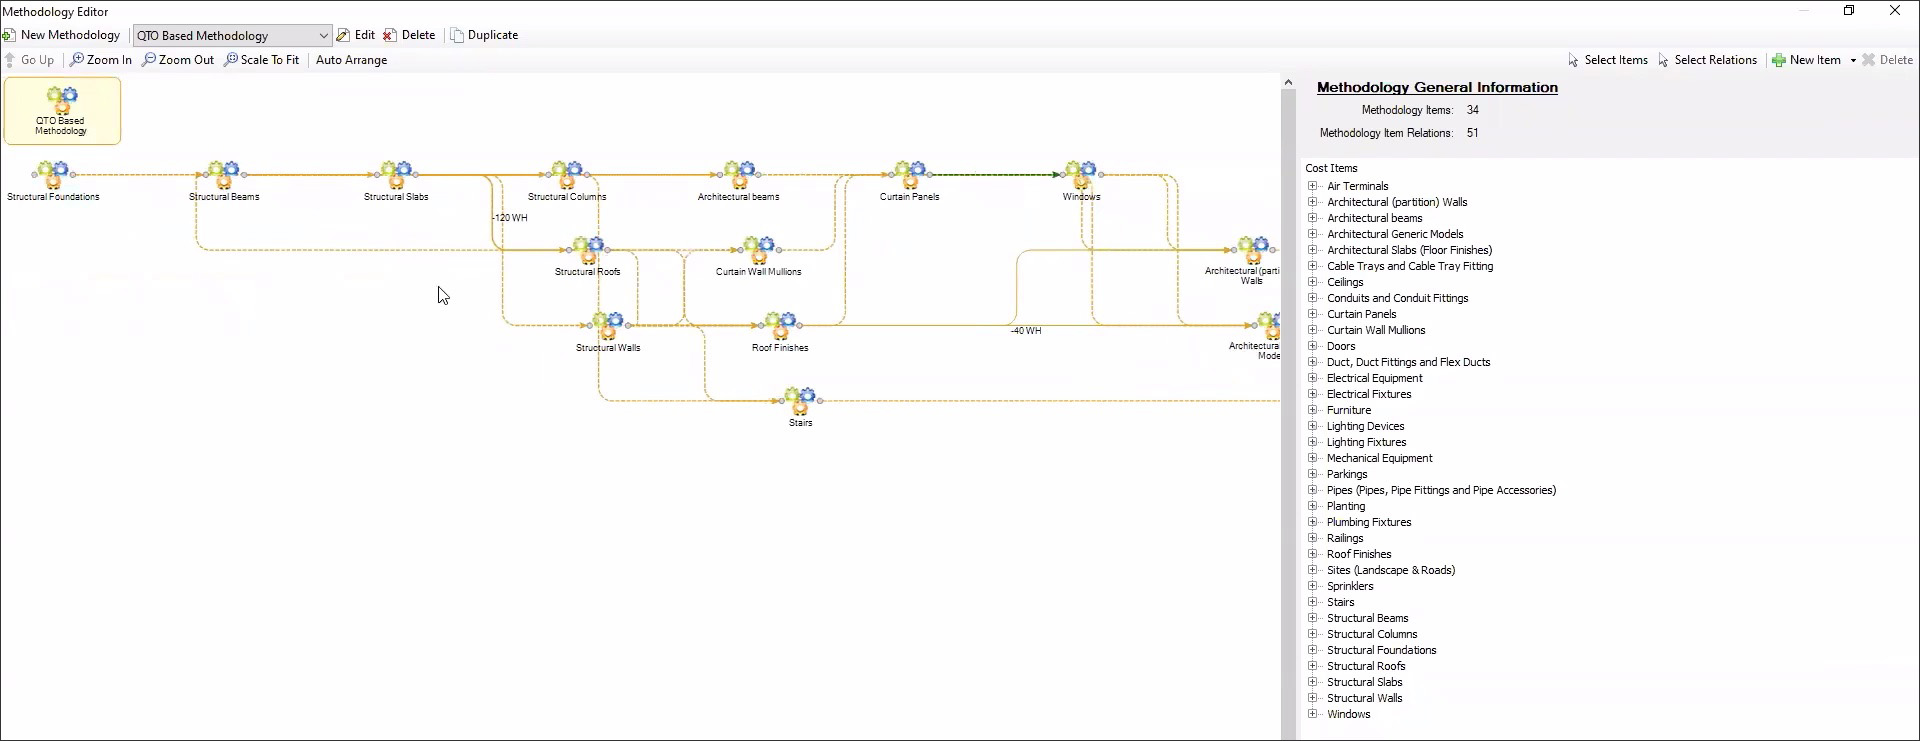
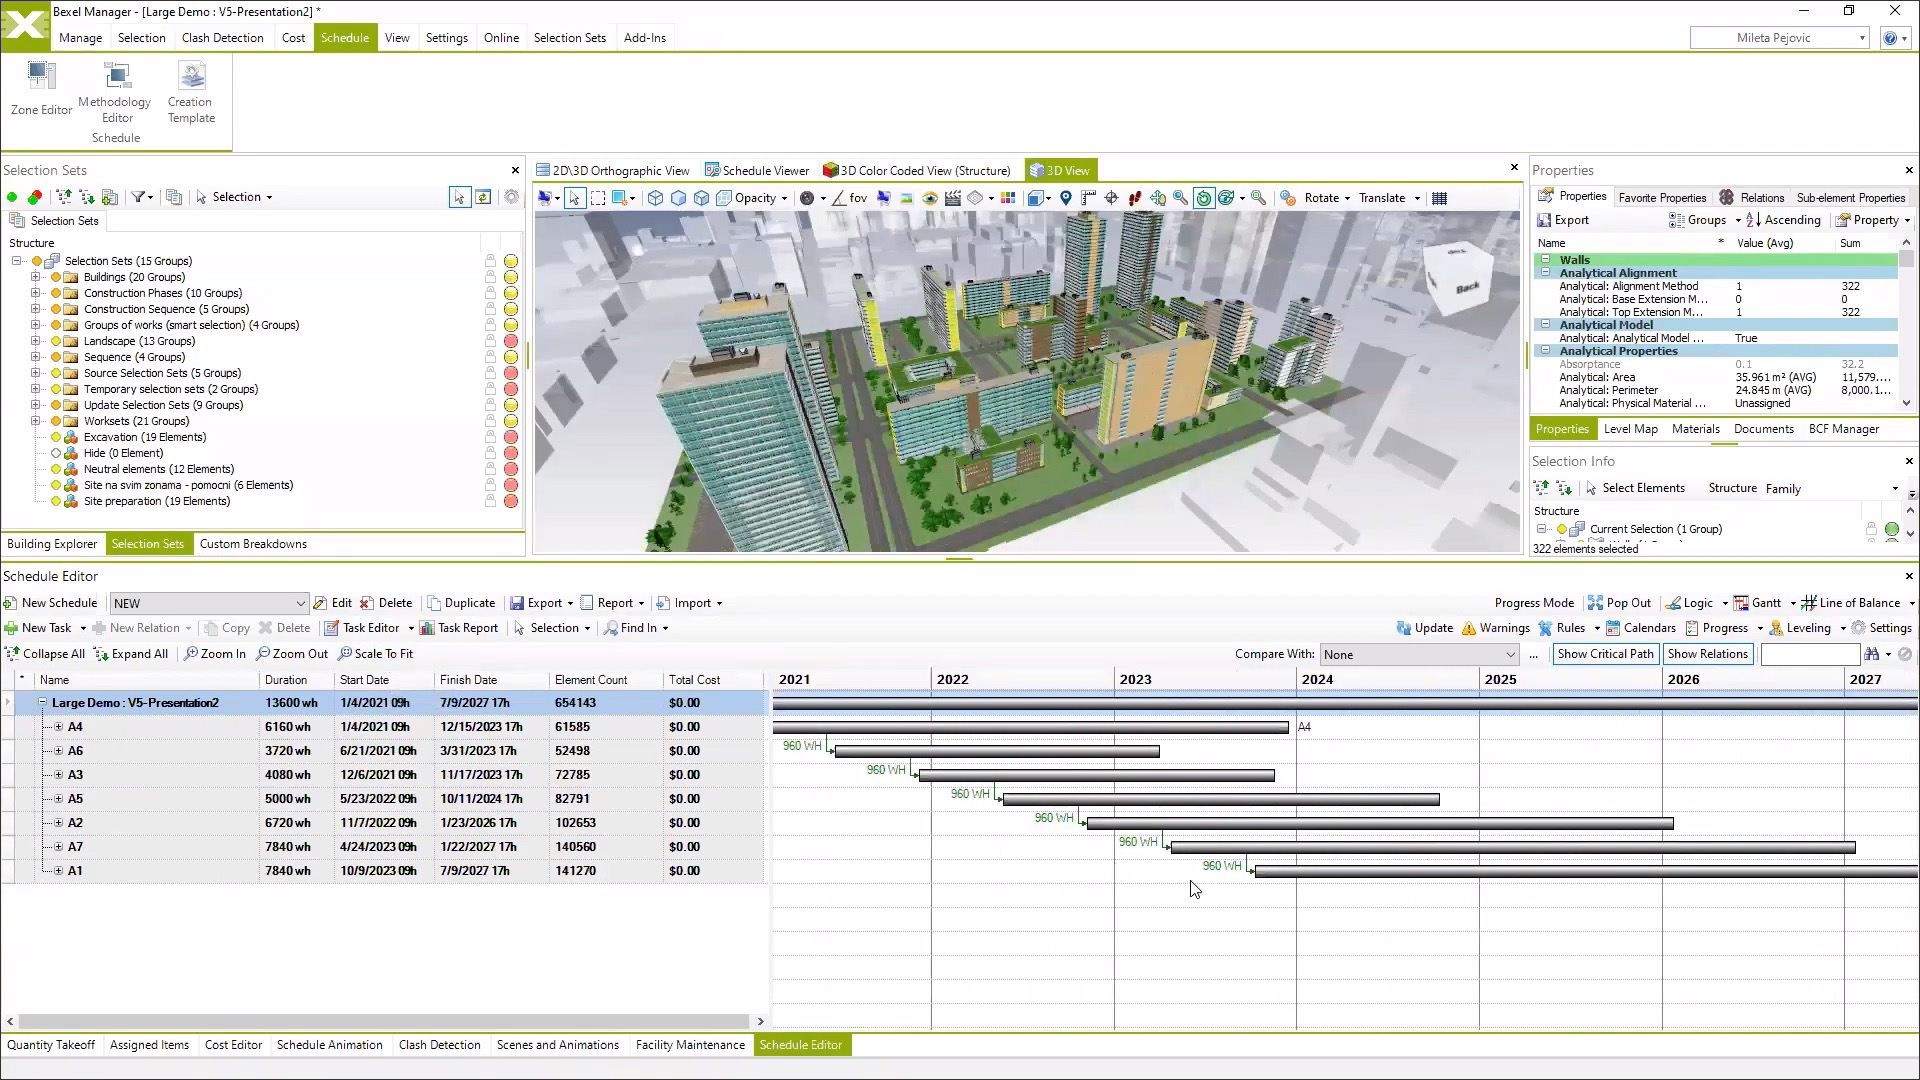
Some of the additional processes in creating an integrated 4D/5D project plan are shown below, including creating cost items from a QTO for costing (Figure 14); defining zones and construction methodologies for scheduling (Figure 15); creating a schedule for a specific methodology (Figure 16); creating an animation of the schedule (Figure 17); and modifying cost items to add resources for more accurate costing (Figure 18).

And finally, I was blown away by some of the construction simulations of various projects done with BEXEL Manager that are available on YouTube.
In addition to the capabilities described in this review, BEXEL Manager has many more, including the ability to create Gantt and LOB (line of balance) charts that are commonly used in project management; tools for tracking and reporting on the progress of the project from the construction site; integration with Microsoft PowerBI for advanced visualization, analytics, and insights on the project; and the ability to attach asset data to the as-built model for facilities management.
Overall, I found the application extremely sophisticated, very aesthetically pleasing, and with such a wide range of capabilities that putting this review together has been quite an overwhelming task! That said, I am glad to see technology continue to push the boundaries of what can be done in AEC to build projects more efficiently and as optimally as possible.
In the course of my research for this review, I came across these very informative articles:
Lachmi Khemlani is founder and editor of AECbytes. She has a Ph.D. in Architecture from UC Berkeley, specializing in intelligent building modeling, and consults and writes on AEC technology. She can be reached at lachmi@aecbytes.com.
Have comments or feedback on this article? Visit its AECbytes blog posting to share them with other readers or see what others have to say.
AECbytes content should not be reproduced on any other website, blog, print publication, or newsletter without permission.